How To Access IoT Devices Remotely With SSH AWS: A Comprehensive Guide
Imagine this: you're sipping coffee in your cozy living room while managing a network of IoT devices scattered across the globe. Sounds cool, right? But how do you actually access IoT devices remotely with SSH AWS without turning your setup into a chaotic mess? Well, buckle up because we're diving deep into the world of remote device management using Secure Shell (SSH) on Amazon Web Services (AWS). Whether you're a tech enthusiast or a seasoned developer, this guide has got your back.
Before we jump into the nitty-gritty, let's get one thing straight—remote access to IoT devices is not just a trend; it's a necessity. As more businesses and individuals adopt IoT technology, the demand for secure and efficient remote management grows exponentially. And that's where SSH AWS comes in. By leveraging the power of AWS, you can create a robust infrastructure that keeps your devices connected and secure from anywhere in the world.
Now, I know what you're thinking—"Isn't this going to be complicated?" Sure, there's some technical jargon involved, but don't worry. We'll break it down step by step so even a beginner can follow along. By the end of this guide, you'll have the knowledge and tools to set up your own remote IoT access system with confidence. Let's get started!
Read also:What Is Remote Iot Examples Unlocking The Future Of Connected Devices
Table of Contents
Why Use SSH for IoT Remote Access?
Understanding AWS Basics for IoT Devices
Step-by-Step Guide to Set Up SSH on AWS
Top Security Tips for Remote IoT Access
Tools You'll Need for This Setup
Common Issues and How to Fix Them
Read also:Does Larry The Cable Guy Support Trump The Untold Story
Optimizing IoT Device Performance with SSH
Best Practices for Managing IoT Devices
Real-World Applications of SSH AWS
Future Trends in IoT Remote Access
Why Use SSH for IoT Remote Access?
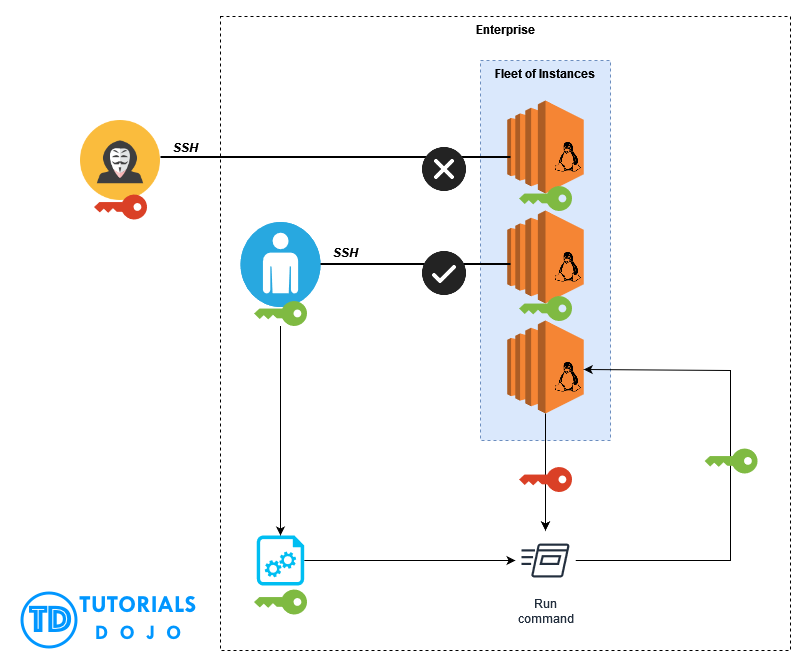
SSH, or Secure Shell, is like the superhero of remote access protocols. It provides a secure channel over an unsecured network, ensuring that your data remains private and intact. When it comes to IoT devices, security is paramount, and SSH delivers on that promise. Plus, it's versatile, reliable, and widely supported by most operating systems. So, why wouldn't you use it?
Here's a quick rundown of why SSH is the go-to choice for IoT remote access:
- Encrypted communication to protect sensitive data.
- Authentication mechanisms to ensure only authorized users gain access.
- Compatibility with a wide range of devices and platforms.
- Easy integration with cloud services like AWS.
Benefits of SSH Over Other Protocols
While there are other protocols out there, SSH stands out due to its robust security features. Unlike HTTP or FTP, which transmit data in plain text, SSH encrypts all communication, making it nearly impossible for hackers to intercept your data. And when you're dealing with IoT devices, that extra layer of security is a game-changer.
Understanding AWS Basics for IoT Devices
AWS, or Amazon Web Services, is like the Swiss Army knife of cloud computing. It offers a plethora of services that can be tailored to meet the needs of IoT device management. From virtual machines to databases, AWS has everything you need to create a scalable and secure infrastructure for your IoT devices.
But what exactly does AWS bring to the table for IoT? Let's break it down:
- EC2 Instances: Virtual servers that can host your SSH server and manage IoT devices.
- S3 Buckets: Storage for device data and backups.
- IAM Roles: Fine-grained access control to ensure only authorized users can access your devices.
- CloudWatch: Monitoring and logging to keep an eye on your devices' performance.
Why AWS is Ideal for IoT
The scalability and flexibility of AWS make it the perfect platform for managing IoT devices. Whether you're dealing with a handful of devices or a massive network, AWS can adapt to your needs. Plus, its global infrastructure ensures low latency and high availability, which is crucial for real-time IoT applications.
Step-by-Step Guide to Set Up SSH on AWS
Alright, let's get our hands dirty and set up SSH on AWS for remote IoT access. Follow these steps carefully, and you'll have your system up and running in no time.
Step 1: Create an AWS Account
If you don't already have an AWS account, head over to the AWS website and sign up. It's free to start, and you can explore most services within the free tier limits.
Step 2: Launch an EC2 Instance
Once your account is set up, navigate to the EC2 dashboard and launch a new instance. Choose an Amazon Machine Image (AMI) that suits your needs—Ubuntu or Amazon Linux are popular choices for IoT applications.
Step 3: Configure Security Groups
Security groups act as virtual firewalls for your EC2 instances. Make sure to allow inbound SSH traffic (port 22) from your IP address or a trusted range.
Step 4: Connect to Your Instance
Use an SSH client like PuTTY or the built-in terminal to connect to your EC2 instance. You'll need the private key (.pem file) you downloaded during instance creation.
Step 5: Set Up IoT Devices
Now that your SSH server is up and running, it's time to connect your IoT devices. This can be done by configuring the devices to communicate with your EC2 instance via SSH.
Top Security Tips for Remote IoT Access
Security should always be at the forefront of your mind when setting up remote access for IoT devices. Here are some tips to keep your system safe:
- Use strong, unique passwords for all devices and accounts.
- Enable two-factor authentication wherever possible.
- Regularly update your devices and software to patch vulnerabilities.
- Monitor logs for suspicious activity and act promptly if anything seems off.
Common Security Threats to Watch Out For
From brute-force attacks to man-in-the-middle attacks, there are plenty of threats lurking in the digital landscape. By following the tips above and staying vigilant, you can minimize the risk of falling victim to these threats.
Tools You'll Need for This Setup
Having the right tools can make all the difference when setting up remote IoT access with SSH AWS. Here's a list of essentials:
- SSH Client: PuTTY, OpenSSH, or any other client you're comfortable with.
- Text Editor: For editing configuration files on your EC2 instance.
- Device Manager: A tool to manage and monitor your IoT devices.
Common Issues and How to Fix Them
No matter how careful you are, issues can still arise. Here are some common problems and their solutions:
- Can't Connect to EC2 Instance: Check your security group settings and ensure port 22 is open.
- Device Not Responding: Verify the device's network configuration and ensure it can reach the SSH server.
- Slow Performance: Optimize your EC2 instance by selecting a more powerful instance type or adjusting your configuration.
Optimizing IoT Device Performance with SSH
Once your system is up and running, it's time to fine-tune it for optimal performance. Here are some tips to help you get the most out of your IoT devices:
- Use compression to reduce data transfer times.
- Implement load balancing to distribute traffic evenly across devices.
- Regularly monitor device performance and adjust settings as needed.
Best Practices for Managing IoT Devices
Managing IoT devices effectively requires a combination of technical expertise and best practices. Here are some guidelines to follow:
- Document your setup and configurations for future reference.
- Set up automated backups to prevent data loss.
- Regularly review and update your security policies.
Real-World Applications of SSH AWS
SSH AWS isn't just theoretical—it's being used in real-world applications to revolutionize industries. From smart homes to industrial automation, the possibilities are endless. Here are a few examples:
- Remote monitoring of agricultural sensors to optimize crop yields.
- Managing fleets of delivery drones for e-commerce giants.
- Enabling smart city infrastructure to improve public services.
Future Trends in IoT Remote Access
The future of IoT remote access is bright, with new technologies and innovations emerging all the time. Here's what to look out for in the coming years:
- 5G networks enabling faster and more reliable connections.
- Edge computing reducing latency and improving performance.
- Artificial intelligence enhancing device management and decision-making.
Conclusion
Accessing IoT devices remotely with SSH AWS is not only possible but also highly beneficial. By following the steps outlined in this guide, you can create a secure and efficient system that meets your needs. Remember to prioritize security, stay updated with the latest trends, and always be ready to adapt to new challenges.
Now it's your turn—what are you waiting for? Start exploring the world of remote IoT access today and take your tech game to the next level. Don't forget to share your experiences and insights in the comments below. And if you found this guide helpful, be sure to check out our other articles for more tips and tricks. Happy hacking!
Article Recommendations