How To Use SSH IoT From Anywhere: Login To Mac Without Hassle
Listen up, tech enthusiasts and curious minds! If you’ve ever wondered how to use SSH IoT from anywhere to log into your Mac without complications, you’ve come to the right place. This guide is your ultimate companion for mastering secure, remote access like a pro. Whether you’re a beginner or an advanced user, this article will break down the process step by step, ensuring you’re equipped with the knowledge to tackle any challenge. So, buckle up and let’s dive in!
In today’s fast-paced digital world, having the ability to access your Mac remotely using SSH IoT is more than just a convenience—it’s a necessity. Whether you’re troubleshooting from afar, managing servers, or simply retrieving important files, SSH provides a secure and reliable method to do so. But how exactly does it work, and what steps should you follow? That’s what we’re here to explore.
Before we get into the nitty-gritty, let’s establish one thing: SSH (Secure Shell) is not just some random tech term. It’s a powerful protocol that allows you to connect to your Mac—or any device—from anywhere in the world. And when you combine it with IoT (Internet of Things), the possibilities become endless. Ready to learn how to harness this power? Let’s go!
Read also:Unlocking The Power Of Agmaal Men A Comprehensive Guide
Understanding SSH: The Backbone of Remote Access
Let’s start with the basics. SSH, or Secure Shell, is like a secret handshake between your devices that ensures they can communicate securely over the internet. Think of it as a digital tunnel that encrypts all your data, keeping prying eyes out while you work. It’s been around for decades, but its importance has only grown as our reliance on remote access has skyrocketed.
Here’s why SSH is a game-changer:
- Security: SSH encrypts all communication, making it nearly impossible for hackers to intercept your data.
- Flexibility: You can use SSH to manage servers, transfer files, or even run commands remotely.
- Compatibility: SSH works seamlessly across different operating systems, including macOS, Linux, and Windows.
Now, when you add IoT into the mix, you’re essentially expanding your reach to include smart devices, sensors, and other connected gadgets. This opens up a whole new world of possibilities, from monitoring home security systems to controlling industrial equipment.
Why Use SSH for IoT Devices?
Here’s the deal: IoT devices are everywhere, and they’re only getting smarter. But with great power comes great responsibility. These devices often lack robust security measures, making them vulnerable to attacks. That’s where SSH comes in. By using SSH to connect to your IoT devices, you’re adding a layer of protection that keeps your data safe.
Some key benefits include:
- Encrypted communication to prevent eavesdropping.
- Authentication to ensure only authorized users can access your devices.
- Remote management capabilities for seamless control.
But here’s the catch: not all IoT devices support SSH out of the box. Some may require additional configuration or third-party tools. We’ll cover that later, but for now, just know that SSH is your best friend when it comes to securing your IoT setup.
Read also:Bollyflixninja Your Ultimate Guide To Streaming Bollywood Movies Online
Setting Up SSH on Your Mac
Alright, let’s get practical. The first step in using SSH to log into your Mac from anywhere is setting up SSH on your machine. Don’t worry—it’s easier than you think. Here’s how you do it:
Step 1: Enable SSH in macOS
Head over to your Mac’s System Preferences and click on “Sharing.” Look for the “Remote Login” option and check the box next to it. Boom! SSH is now enabled on your Mac.
Step 2: Find Your Mac’s IP Address
To connect to your Mac remotely, you’ll need its IP address. You can find this by going to System Preferences > Network and selecting your active connection. The IP address will be listed under “Status.” Make sure to jot it down—it’s crucial for the next steps.
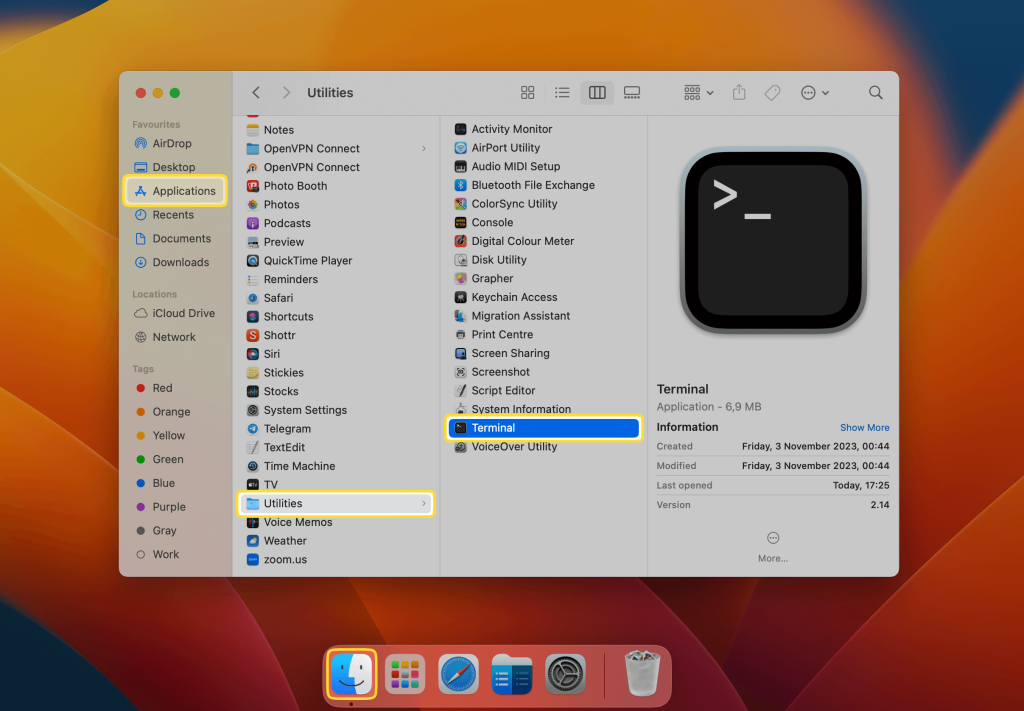
Step 3: Test Your Connection
Open up your Terminal app and type the following command:
ssh username@ip_address
Replace “username” with your Mac’s username and “ip_address” with the one you noted earlier. If everything is set up correctly, you should be prompted to enter your password. Once you do, you’ll be connected to your Mac remotely.
Connecting to Your Mac from Anywhere
Now that you’ve got SSH running on your Mac, it’s time to take it to the next level. But here’s the thing: by default, your Mac’s IP address is only accessible within your local network. To connect from anywhere, you’ll need to set up port forwarding or use a dynamic DNS service. Let me explain.
Option 1: Port Forwarding
Port forwarding is like giving your Mac a front door that’s visible to the outside world. To set it up, log into your router’s admin panel and find the “Port Forwarding” section. Add a new rule that forwards port 22 (the default SSH port) to your Mac’s IP address. Easy peasy.
Option 2: Dynamic DNS
If your IP address changes frequently, dynamic DNS is the way to go. Services like No-IP or DynDNS allow you to assign a static domain name to your changing IP address. This means you can always connect to your Mac using the same address, no matter what.
Securing Your SSH Connection
Security should always be your top priority when using SSH. After all, you’re essentially opening a door to your Mac for anyone who knows the right combination. Here are some tips to keep your connection safe:
- Use Strong Passwords: Avoid using simple or common passwords. Mix uppercase, lowercase, numbers, and symbols for maximum security.
- Enable Key-Based Authentication: Instead of relying on passwords, generate an SSH key pair and use it for authentication. This is much more secure and eliminates the risk of brute-force attacks.
- Change the Default Port: Hackers often target port 22, so changing it to something less obvious can deter them.
- Limit Access: Restrict SSH access to specific IP addresses or users to minimize the risk of unauthorized access.
By following these steps, you’ll significantly reduce the chances of someone gaining unauthorized access to your Mac.
Using SSH with IoT Devices
Now that you’ve got SSH up and running on your Mac, let’s talk about integrating it with your IoT devices. The process varies depending on the device, but here’s a general overview:
Step 1: Identify Your IoT Device
First, determine whether your IoT device supports SSH. Many modern devices, especially those running Linux or similar operating systems, have SSH built-in. If not, you may need to install an SSH server manually.
Step 2: Connect to Your Device
Once SSH is enabled on your IoT device, you can connect to it just like you would with your Mac. Use the following command:
ssh username@device_ip
Again, replace “username” and “device_ip” with the appropriate values for your device.
Step 3: Secure Your Connection
Just like with your Mac, make sure to secure your IoT device’s SSH connection. Use strong passwords, enable key-based authentication, and consider changing the default port if possible.
Common Issues and Troubleshooting
Let’s face it: things don’t always go as planned. Here are some common issues you might encounter when using SSH, along with their solutions:
- Connection Refused: Double-check your IP address, port number, and firewall settings. Make sure SSH is enabled on your device.
- Authentication Failed: Verify that you’re using the correct username and password. If you’re using key-based authentication, ensure your key is properly configured.
- Timeout Errors: This could be due to network issues or incorrect port forwarding settings. Check your router’s configuration and try again.
If none of these solutions work, don’t panic. Reach out to the device’s manufacturer or consult online forums for additional help.
Best Practices for Using SSH IoT
To get the most out of SSH IoT, here are some best practices to keep in mind:
- Regularly Update Your Devices: Keep your Mac and IoT devices up to date with the latest software and security patches.
- Monitor Your Connections: Keep an eye on who’s accessing your devices and revoke access to anyone who shouldn’t be there.
- Use Encryption Whenever Possible: Encrypt all data transmitted over SSH to ensure it remains secure.
By following these best practices, you’ll not only improve the security of your setup but also enhance its overall performance.
Conclusion: Take Control of Your Digital World
And there you have it—a comprehensive guide on how to use SSH IoT from anywhere to log into your Mac without complications. Whether you’re a tech enthusiast or simply someone looking to streamline their workflow, mastering SSH is a skill that will serve you well in the long run.
So, what are you waiting for? Start experimenting with SSH today and unlock the full potential of your devices. And don’t forget to share this article with your friends and colleagues—if they find it helpful, drop a comment below and let me know. Happy hacking!
Table of Contents
Understanding SSH: The Backbone of Remote Access
Step 2: Find Your Mac’s IP Address
Connecting to Your Mac from Anywhere
Step 1: Identify Your IoT Device
Step 2: Connect to Your Device
Step 3: Secure Your Connection
Common Issues and Troubleshooting
Article Recommendations